
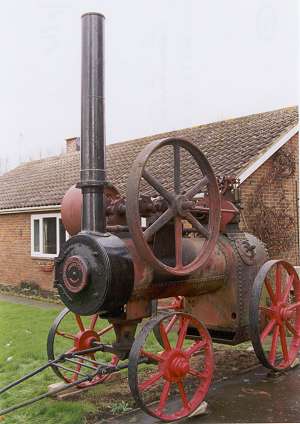
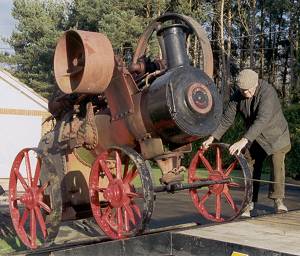
Peter Love's Steam Portable - No 21693
Davey Paxman & Co manufactured its portable steam engines in large numbers from the 1870s until the mid-1920s. The ravages of time, assisted by our frequently cold damp British climate, have left very few survivors in this country. One surviving example in the UK, is No 21693. This 3 NHP portable was ordered by the Neuchatel Asphalte Co, under Paxman order number 15663, on 19th February 1925 and despatched from the factory shortly after, on 11th March.
The engine was purchased in January 2003 by Peter Love of East Sussex who kindly provided the information and photographs for this page. With the help of fellow preservationists, Peter did a good deal of work on the engine in early 2003 and had hoped to get his new acquisition back into steam in the summer of that year. Other heavy work commitments then intervened and completion of the project has been substantially delayed.
All photographs on this page are © Peter Love 2003 and may not be reproduced without permission.
The first six pictures below were taken by Peter on 10th January 2003, the day he bought the engine, after it had been unsheeted and the homemade chimney fitted for the occasion.
 |
Steam portables were used to power a wide range of belt driven machinery. At the latter end of its working life this engine was used to power a guillotine in Hills scrapyard at Stock, near Billericay, Essex. The portable itself would have ended up as scrap had it not been purchased in 1959 by the late Mr R D Smith of Inworth, near Colchester. An interesting feature shown in the photograph here is the unusually wide pulley wheel on the crankshaft. |
| In 1964 the engine was purchased by Derek Reeder of Cranbrook, Kent. For many years it was stationed at Jess Swatland's house near Goudhurst, Kent. Sadly, Jess passed away in 2002 and the engine was brought back to Cranbrook where it is pictured here. |
 |
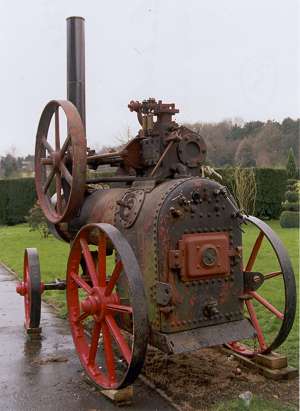 |
Certainly a very complete engine, the boiler was retubed in 1976 by the Kent & East Sussex Railway. It was steamed only once after being retubed. Despite this the boiler was found to be full of scale when Peter washed it out on 16th January 2003. The boiler was inspected on 28th January 2003. The inspector found it had done little work and was in good condition even though the plate was only 5/16" thick when new. The water gauge frame had to be removed as the inspector wanted to see all the fittings. Peter intended to purchase a new set for the engine, the old ones having been brazed up. He also took off the pet cocks which were an odd pair, planning to replace them with a matching pair. The original lagging is still with the engine and shows traces of maroon. It is interesting to note this is the colour on the oldest surviving portable we know of, No 11692, shown on the Surviving Portables page. On Peter's engine the cylinder lagging is the only part which can be used again. |
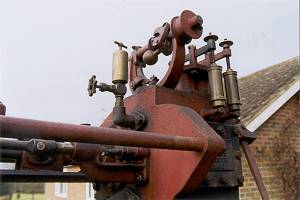
| Jess Swatland completely rebuilt the motion including the horizontal governors. He replaced the valve and piston rods in addition to sorting out the bore and renewing the broken piston rings. New rings were supplied by the Bradford Piston Ring Company. Visible in the centre of the photograph is the displacement lubricator wheel. The cast lettering on this is still in very good condition. Alex Walford, the authority on Paxman engine governing, says a horizontal governor is very rare on Paxman portables. |
 |
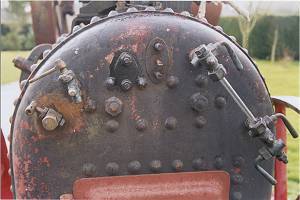 |
Although not fitted the pressure gauge is in excellent order but the pet cocks (water level taps) were an odd pair. Peter thought he would face a possibly difficult search for a matching pair to replace them. In the event, by early February 2003, an excellent new pair had been made and donated by a friend, John Bailey of Borough Green, Kent. |
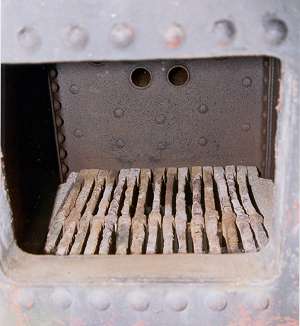
| A view through the fully open straw burning door, revealing the firebox and the excellent condition of the firebars. In common with all Davey Paxman portables known to Peter, no foundation ring or 'Z' ring is fitted. |
 |
Naturally Peter was delighted and excited by his new acquisition. It is better not to enquire whether the joy was shared to the same degree by his wife! A colleague commented: 'well you have got enough now to keep you going until you are 65'.
Restoration Log
Many of the details in the following log are illustrated and further discussed in a later section of this page.
- Friday 10/01/03
- Purchased portable at Cranbrook
- Saturday 11/01/03
- Transported portable back to East Sussex on low loader.
- Thursday 16/01/03
- Tubeplate washout plug removed and inside of boiler pressure washed
- Saturday 25/01/03
- Restored mudhole - built up flanges using low halogen 3.2mm welding rods, cleaned up with 5" grinder, and finished with coat of red oxide paint.
- Tuesday 28/01/03
- Boiler inspection carried out by Tony Reen of West Sussex.
- Thursday 06/02/03
- Built up backhead of gauge glass frames with weld in readiness for tapping threads for securing bolts.
- Saturday 08/02/03
- Tony Reen, boiler inspector, had asked that all fittings and studs be removed for inspection and replacement before the hydraulic pressure test is done. First task of day was to remove pet cocks (water taps). Top one looked more original of the two and was exceptionally tight. Steam engineer Brian Hope was on site and produced a 24" stilson wrench. After protecting the cock from damage, careful persuasion achieved the desired result. The other cock had previously been removed so came away more easily.
After removing top pet cock, the hole was found to be blocked. Cause of problem was a bird's nest which had not been removed by the pressure washing on 16th January.
Threads in the backhead for the pet cocks were cleaned up using a tap with a ½" gas thread. This was followed by a trial fitting of the new pet cocks (see photo) made by John Bailey.
An important achievement was discovering the number of the engine, as shown and explained later.
Top and bottom water gauge glass frames were removed from the boiler, and after some effort the ¾" gas threaded steel bushes were removed. Jerry Parsons of Crawley, Sussex, has provided a set of authentic gauge frames, with ½" gas threads, which will be fitted to the engine.
Peter built up the plate and holes around the areas of gauge and pet cock fittings as requested by Tony Reen. Brian Hope then carefully reamed out the holes before they were tapped and deburred. - Sunday 09/02/03
- Repaired broken fire-door hinge. Door would swing on top and bottom hinge pin housings which are attached to door itself. Intermediate housing is part of cast iron bracket bolted to firebox. A 2" section of this intermediate housing had broken off and pin was seized solid in remainder of housing. Heated housing with oxy-acetylene torch for five minutes before carefully driving out pin with club hammer. Damaged area of housing too large to build up with cast iron rods. Decided to cut housing off bracket using mechanical hacksaw. For new housing turned down piece of 1½" mild steel rod to 1¼" on Jeff and Roland Burgess's lathe. Bored 5/8" hole through centre and finished with 5/8" clearance reamer. Welded new housing to original cast iron bracket using nickel rods and cleaned up with files. Hinge fitted with new stainless steel rod which will eventually be made into pivot pin. Door adjusted for good fit and hinge bracket finished off with quick drying cellulose based red oxide paint.
- Sunday 16/02/03
- A busy day as work commitments will prevent further work on the engine for next four weeks or so. Worked mainly on upper section of chimney
Chimney should comprise lower section attached to the smokebox, connected by a hinge to upper section which can be folded down when not in use. On No 21693 hinge had broken off some years ago. Upper section clearly not original and was fixed so it could not fold down. Immediate aim to restore connecting hinge. Longer term intention to build new upper section, approx 8' long, closer to original design.
Upper section of chimney was welded. Cut through chimney just above its flanged base to make base easier to handle. Base flange originally 2" thick with 7" upstand. Aim was to reduce flange thickness to ¾" and upstand height to 2". Task turned out to be lengthy and frustrating.
My 6" Colchester Student lathe and tool tips struggled because of hard spots in the base. Transferred job to Roland and Jeff Burgess's 8" Harrison lathe. Job chronically slow but finished by about 2-00pm.
After lunch punched inner section of chimney out of the base. Discovered weld penetration between ring section of base and upstand was non-existent. Welded these together from the inside, cleaned and dressed up weld.
Base upstand drilled with ½" clearance drill to take ½" rivets. Rivets threaded on lathe so they can be removed from base at later date when new 8ft riveted chimney is constructed. For present will use ½" stainless Whitworth nuts on rivets to avoid corrosion problems.
Next task was to prepare other part of upper chimney section for pushing into its base. Ground down weld splatter on chimney joint and cleaned paint off bottom area where it fits into base. Chimney was distorted due to welded construction so knocked into round using hammers and dollies.
Placed chimney upright and greased the joint section. Refurbished base was placed, upside down, on top of chimney and, using a 6" wooden block, eased onto it. At this stage holes not drilled into chimney as need to check its vertical alignment when fitted on engine. Also have yet to fit set of dummy rivets down rear length of chimney.
By late afternoon was none too pleased with progress made! However finished day off by turning down 7" x 1½" round rod, to 1¼" diameter for hinge housing. Now run out of time. Assembly of chimney on engine, sorting out lower (smokebox) chimney section, and welding things together, will have to wait.
AT THIS STAGE WORK CEASED FOR A FEW WEEKS DUE TO WORK COMMITMENTS INCLUDING A VISIT TO AUSTRALIA. - Thursday 10/04/03
- Spent a couple of hours riveting up the chimney then fitting the assembly back on the engine. The chimney base is now restored to its original specification, even to the extent of using countersunk rivets to join the base to the chimney. Applied red oxide paint to the chimney and base.
- Friday 11/04/03
- Early evening made new chimney pivot pin using stainless steel. Needed to ream out the chimney base for a good even fit which took much longer than the five minutes planned for the job.
- Sunday 13/04/03
- Removed safety valve assembly, cut plate for hydraulic test, marked and drilled holes. Fitted rubber gasket under regulator valve, then cut and fitted a block of wood 2" x 3" to hold down the valve. Made rubber gasket for blanking plate and bolted these down on engine.
Pressure washed engine again and refitted ash pan. Fitted a matched pair of wheel handles on water pump body, after filing out squares to fit valve spindles. Made firehole door hinge pin in stainless steel, drilled split pin hole and refitted. Made new pump ram connecting pin and slide-valve rod connecting pin as the one which came with the engine was short.
Owing to pressure of work this will be the last day I can properly work on the engine before it appears at the SSEC 'Gathering' at Laughton on April 27th. The engine will not be in steam as there are still a few things to do before the hydraulic test which is now scheduled for mid-May. - Saturday 03/05/03
- 6.30pm - Roland Burgess kindly turned up on his lathe a new 5" x ¾" mud hole lid stud. The old one was bent and the threads worn. Cut and drilled out the old stud which had been riveted over. Tapped a 7/8" Whitworth thread in the mud hole and screwed in the new stud. Then welded the stud and mud hole together and built up the flange area of the mud hole which had become heavily corroded. Ground up the assembly which now looks good as new. Finished at 10.45pm with a coat of red oxide paint.
- Monday 05/05/03
- 9pm - Built up, with weld, the mud hole bridge bar as heavy corrosion had taken place presumably from the leaking pet taps over many years.
- Sunday 11/05/03
- Rebuild 0/S/R bridge bar which had become worn and pitted with rust. Welded bridge bar and ground as required - burnt out garnierite in process! Dressed with file and polished with sanding wheel - then polish again on electric wheel. Refitted bridge bar.
Brian Hope kindly came over and filed thread out of washout plug hole in tubeplate. Then retapped as 1½" BSP. Awaiting new plug which is to be made by John Bailey.
The plan is to pressure test the boiler for a working pressure of 120 psi. Before this can happen new joints must be purchased and fitted. Items now on order include the four mud-hole door joints (3" x 2.1/8" x 3/8" x ¼"), one for the rebuilt boiler bottom mud-hole door (3½" x 2½" x 3/8" x ¼"), and the large boiler joint (9" x 7" x 1" x ¼"). Asbestos joints are now banned, so Peter plans to try wire reinforced Kevlar cloth joints instead.
Unfortunately at this stage heavy work commitments intervened and work on the restoration had to be put on hold.
Some Restoration Images
 |
Getting the engine back to the depths of East Sussex was the first task. On Saturday 11th January Simon Tingley and his father, Arthur, came to collect the engine at 1-45pm with a 7.5 ton rigid flatbed lorry. Arthur is seen here making sure the front wheels are in the right position while Simon (just off the photograph) operates the electric winch. The picture provides a good view of the boiler saddle and front axle swivel. Arthur is no stranger to preservation, being well known in the tractor world as the "Oliver King". Some fifty years ago he assisted farmer Frank Knight of Burgess Hill, Sussex in taking a couple of steam portables to Edwin Hole's scrapyard. One came from Willets of Linfield, the other from a sawmill at Cooksbridge. It is said both were exported to Russia. |
| 'What goes up, must come down'. The lorry having safely transported its precious cargo to East Sussex, Peter's neighbour, Mike Hallewell, is roped in to assist with unloading. Pictured left to right are Mike, Arthur and Simon just before starting to unload the engine. | 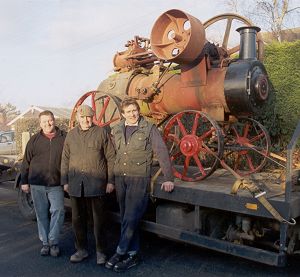 |
 |
On Thursday 16th January the tubeplate washout plug was finally removed after warming the hollow brass plug with propane and oxygen. As the plug cooled water was added, which shrunk the offending item, enabling the plug to be unscrewed with the threads still intact. However a new tapered solid brass plug is to be made by professional steam engineer Brian Hope, of Yalding, Kent, a personal friend of Peter's for some 25 years. The pressure washer was assembled, all the mud holes were removed, and two hours later the boiler assembly was washed clean. |
| Shown here is clean water pouring through the boiler washout hole after the worst of the debris has been flushed out. Sadly, after removal of the asbestos gasket, the mudhole flange was found to have crystallized into little pieces. A substantial quantity of rubbish came out of the 23" diameter boiler barrel and inner firebox water space. Some of this can be seen on the floor towards the bottom left of the picture. Peter discovered the engine was not that easy to wash out properly compared to his 3 NHP Marshall which has a manhole on each side of the firebox outer wrapper. |
 |
 |
In this picture of a small section of the flywheel, one can see remains of the old maroon paintwork. The paintwork was revealed after the flywheel had been pressure washed. The colour is similar to that found on the crankshaft horn brackets and on portable No 11692 shown on our Surviving Portables page. |
| Four hours hard work went into restoring the mudhole on the evening of Saturday 25th January. After building up the flanges using low halogen 3.2mm welding rods, it was cleaned up with a 5" grinder. A coat of red oxide paint and the boiler mudhole is like new again, ready to be put back in service. |  |
 |
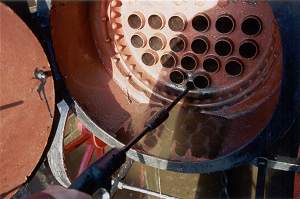
On Tuesday 28th January, well-respected West Sussex boiler inspector Tony Reen visited to carry out a full dry boiler inspection. This included a thorough ultrasonic test of the boiler assembly plates, inside and out. Shown here is Tony using his test equipment to measure the thickness of the boiler throatplate by the nearside mudhole. The ashpan and firebars, both in excellent order, were removed so that the inside firebox throatplate could be tested. Not an easy task for Tony, lying on the floor under the firebox, as he had to work round the rear axle which runs across the firebox space. The final part of Tony's inspection was an ultrasonic test on the boiler tubeplate. He declared at this stage all was well with the boiler assembly. Tony feels the engine has done little work during its life and has been kept inside as the boiler outer shell shows no pitting whatsoever. This is excellent news for all who are interested in preservation. |
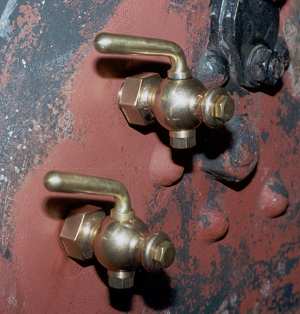
| Shown here are the new pet cocks which were made at very short notice by John Bailey of Borough Green, Kent. They have taper threads and will certainly enhance the engine. John Bailey is a keen steam enthusiast and owns an immaculately restored 1906 Burrell 7 NHP single-crank compound engine, No 2819. |
 |
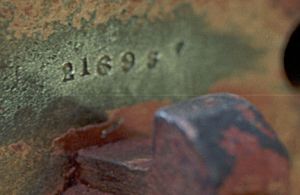 |
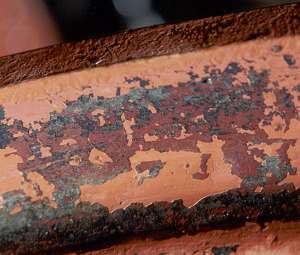
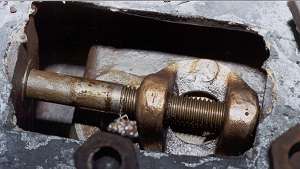
Although the engine has been in preservation for 44 years, its number was unknown until this year. Peter had examined the engine closely several times and found numbers which he thought might provide the answer. Richard Carr was asked to check them against the old Paxman order book but none matched any 3 NHP portable. Peter was almost despairing until at last he uncovered, on February 8th, the numbers shown here. Richard Carr confirmed that it by no means unusual to experience difficulties in finding the number on a Paxman portable. Frequently it is on the end of the crankshaft but in this case was found on the flywheel boss. It was made with a small ¼" punch set. The number 21693 has been checked against the Paxman order book, which confirms this 3 NHP engine was ordered by the Neuchatel Asphalte Co on 19th February 1925 and despatched three weeks later on 11th March. The last letter may look like a 5 in the picture but is definitely a 3. |
| On 9th February Peter repaired the broken firedoor hinge. Pictured here is the door held upside down in a vice while the centre hinge pin housing is heated with an oxy-acetylene torch. At this stage most of the pin has been driven out. The damaged area of the housing is clearly visible just below the torch head. | 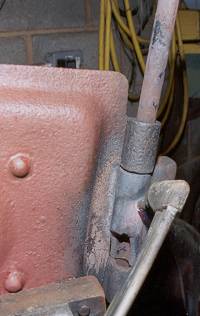 |
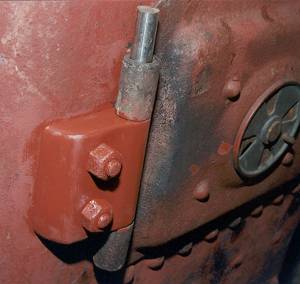 |
The reconstructed hinge bracket, complete with a coat of red oxide paint, and the fire-door are back in place. A little more work remains to be done on the new stainless steel pivot pin. |
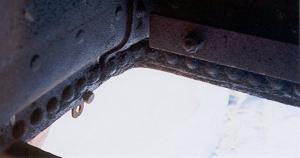
| As previously mentioned, there is not a foundation ring (sometimes called an ogee or 'Z' ring) in the bottom of the firebox. Shown here is the inside of the firebox where the outer wrapper meets the back tube plate. |
 |
 |
To the left is the regulator valve and the new regulator rod made at the Maidstone & District Bus Company's works. Before the hydraulic pressure test, rubber will be placed between the valve and the seat to act as a seal. This will be held down by a small block of wood and a plate bolted down over the area where the safety valves normally sit. |
| Water was found in the slide-valve chest. Fortunately the surfaces have not been affected as they had been coated with grease. The late Jess Swatland ground the valve into the face; he also fitted the new valve rod. |
 |
Peter Love
Peter Love is a founder member of the Sussex Steam Engine Club and was its Chairman for ten years. Editor of Tractor & Machinery, the leading magazine on vintage and classic tractors, he is also a contributor to such well-known engine enthusiast magazines as Old Glory, Stationary Engine, NTET Steaming and the Road Locomotive Society Journal. He first stood on a traction engine at the age of two and now owns a number of steam engines which he has restored to concours standard. Over the past 25 years he has commentated at steam rallies in the UK and as far afield as South Africa, Australia, Germany, the USA and Canada.
Page updated: 08 APR 2008